

“Telemaster” Kit Build
While I’ve made instruments from scratch before, and also assembled guitars from parts, I’ve never built a kit from scratch… until now. I found out about PitBull Guitars from a friend and checked out both their kits and the forum they run and there were so many cool options I thought I’d jump in. The goal was to keep the cost as low as possible so I went with a basic Tele kit. I’ll update this post along the way to detail my progress.
06/08/16
And so it begins…
The TL-1 kit arrived at work yesterday arvo and was duly checked out by the other musos around me (one of whom is close to ordering his own kit, and another who has already got one!). I got home and did a check and everything looks good – a small dent in the body on the lower horn but nothing that will cause any problems. Very impressed with the neck (maple fretboard) too.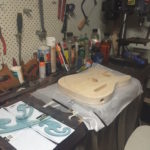

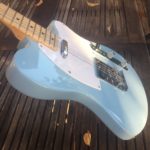
Now my plan with this kit is to do something a little different. I’ve always loved offset shapes, so I’m playing around with re-shaping this body: a hybrid Telecaster/Jazzmaster: a Telecaster. I originally wanted to do it to a strat body, but I’m not comfortable with the plan I have for that one yet, so the Tele gets to go under the knife first. I’m also really looking forward to the finishing process – I haven’t done much spray painting, so that should be fun. The plan is for a Sonic Blue finish.
I’ve got the French curves out to help get the right feel (I’ve always found them useful) and I’ve started marking some lines. Unfortunately I’m heading out for the rest of the day so the firing up the jigsaw will have to wait…
08/08/16
A quiet first weekend on the build front but did manage to get the headstock roughed out – freehand pencil sketch to get the shape then a jigsaw to cut it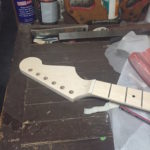
The plan for this week is to start on some shaping work with the body…
Got home from work and though, what the heck, let’s cut some wood… Still very rough (just a single jigsaw cut – it’ll look better 

13/08/16
Little bit of work on it today – refined the shape a bit more. I think the extra bit taken out of the lower top horn helps a lot. Still 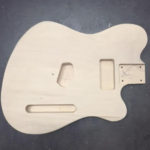
Then I took the rasp to do a bit of body contouring. Baby steps at this stage but it certainly feels nice when I hold it in a playing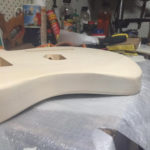
21/08/16
A good build day so far! With the neck sanded to 1200 I decided on a whim that I wanted to stain the maple a little. I had some FeastWatson Old Baltic prooftint and tried it on a maple scrap – I didn’t want much colour at all, just a little warmth, and the Old Baltic stain worked well as long as I applied it very lightly with a rag. I did the neck, liked the result and figured the fretboard could use a little warmth too. I used the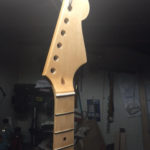
Next step was to make a body holder for painting…so I did! I had a piece of 70mm wide pine so just cut it back to 50mm for the pocket, and maybe 25mm of so for the handle part. Drilled a big hole in the top as I’ve got no idea where I’ll be hanging it during the painting/curing phase but figured a big hole wouldn’t hurt. One thing I saw on a video was the addition of the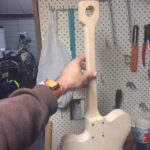
Okay, time to Timbermate the body – another new experience, and surprisingly straightforward (I wiped/rubbed it all over the body rather than rollers or “scrapers” as I’ve seen mentioned), then sand back with 400, 
I then attached my neck holder thinga and started priming (using Rust Proof All Purpose White Primer). I did use painters tape to mask the neck pocket, but left the other cavities open to at least get some paint in them – still not sure if I’ll fill them with the colour coat, although not sure why I’m even thinking about not doing so.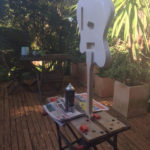
One light coat and now I sit and wait for an hour or so before doing another. With any luck that will have me able to lightly level it off with 600 in the morning, and then perhaps a first colour coat after work tomorrow!
23/08/16
The good news is my decal paper arrived yesterday so I printed out some logos and applied one this morning. 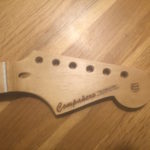
27/08/16
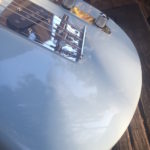
With the return to sunny skies I’ve started on the colour coats. The colour looks pretty solid at this point (I’m using MTN94 spray) but the surface looks a little like 1200 sandpaper – smooth but with a very fine texture.
28/08/16
So this morning I go back to view my handywork and I’m a little disappointed. There was a very subtle “striping” 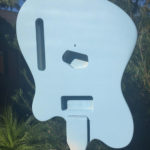
Later this afternoon I very gently used some 800 to flatten off the colour coats and started with a fine gloss mist, and then a more substantial gloss coat half an hour later. Hopefully I’ll get the chance to get a few more on during the week, but it’s a nice feeling to be on he home straight in the finishing department.
Knowing I’m going to be heading into the curing phase before long I’ve already started thinking about my next kit, or more to the point how I’ll go about modding my next kit!
30/08/16
My latest potential problem has occurred with my gloss coats. I’ve got four coats 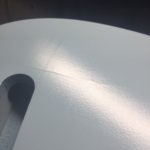
04/09/16
I’ve been slowly but surely applying gloss coats – trying to keep them thin and even. I’ve had to do a bit of very light sanding along the way and I’m now up to 9 coats and I think that’s enough. Now it has to cure for a couple of weeks before I start cutting and buffing! In the meantime I’m trying to work out what to do with the pickguard!
12/09/16
After 10 days of curing (yep, I know that may not be enough!!) I couldn’t help myself and decided to do 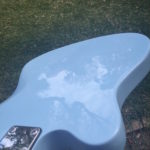
22/09/16
It’s been pretty slow going on the build with other commitments (yep, I know I need to get my 
25/09/16
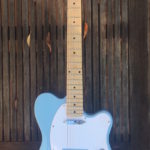
Done! Yep, in a flurry of acrtivity yesterday afternoon after coming home from a weekend away I managed to get everything done! The only thing I really needed to do pre-assemble was to shape the pickguard a little more, but once that was done everything came together very quickly. Also happy to say that it sounds pretty good too – I’d always planned to stick with stock electronics until the end and then assess whether to switch out for better components and while the three-way switch is a bit scratchy it’s overall very nice. Can’t wait to play it some more – in between getting going on my next build! This is was first Pitbull Guitars kit build and the overall experience has been really great – from the quality of the TL-1 kit supplied through to the fantastic support the brain’s trust on the forum supplied.


Pingback: Cool Stuff: Free-Way Ultra Switch - The Cavan Project
Pingback: Compañero Bass IV Project - The Cavan Project
Pingback: Original Song: Birds Are Flying Overhead - The Cavan Project