
Compañero Bass IV Project
Okay, on to the next build! I received a Pitbull Guitars JB-4 kit from the family for my birthday as I’ve been working on a plan based around it for a couple of months. Once the kit arrived I did a quick check of everything and it all looked good. Whereas the “Telemaster” build was focused on the finish and the body reshaping, the plan here is more around a creative process with the wiring. What I’m planning to do is use a similar setup to a Fender Bass VI, but with three jazz pickups – effectively a Bass IV. The difference is that, other than just being a 4-stringer, each pickup will have its own “stack” vol/tone control using concentric pots. Each of the three pickups will be able to be switched on and off like the Bass VI, but the Bass IV won’t be including the “strangle” switch. The third pickup will be located very close to the neck. The lack of a master tone/vol could make it a little fiddly live, but should be fine for home recording and it will hopefully give me some interesting sounds.
The original plan also included a stereo output jack, where the tip could be routed to one amp and the ring to another, and having a three way switch for each pickup so I could send one pickup to one amp and the other pickups to another. I’ve now decided that’s a bit of overkill for a four-string bass, but may well use the idea on a guitar build in the future.
Anyway, other than the wiring I’ll also be doing a bit of re-shaping on the body (‘cos I can’t help myself), and some other component mods – but we’ll see what happens with them as it progresses.
I’ve already ordered all the extra bits I need, so this weekend I’ll hopefully get started.
10/10/16
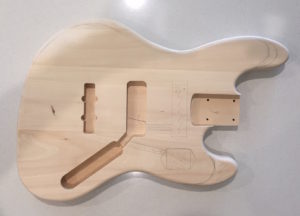
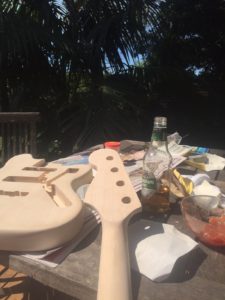
A bit of progress over the weekend… I marked up the body with the reshaping and routing I need to do to really get a Bass IV feel…
then made a routing template for the switch cavity and the third pickup…
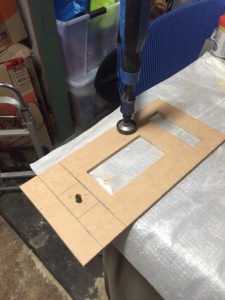
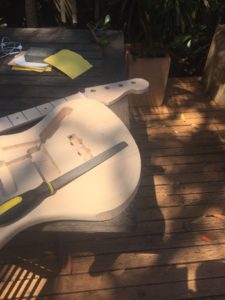
Broke out the router, and while it’s not the neatest job, it will do (all the messy bits will get covered by the pickguard anyway). I then reshaped the horns to get a more “Bass IV” feel.
And finally broke out the router, and while it’s not the neatest job, it will do (all the messy bits will get covered by the pickguard anyway).
Next steps will be a little bit of work on the bridge pickup cavity. The current hole is designed for the shorter pickup – something a friend also had with his JB-4 kit build – so need to expand the tab slots a little to take the longer pickup.
I might expand the middle pickup cavity a little too as getting the three pickups evenly spaced is very tight at the moment.
15/10/16
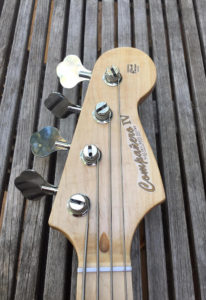
A very pleasant day of building so far! I ended up taking the jigsaw/rasp/sandpaper to the body a bit more, as well as fixing up the cavities. I also shaped the headstock – a freehand version of a Fender one as I like the shape but don’t want to have an “exact” replica.
I then went through the same sanding process I went through last time on the body. I realise most start with 240, but I quite like starting with 60! I realise that the body reshaping I do means more of a heavy-handed sanding approach, but I do find that it’s nice to be able to change the feel of other areas of the body that I haven’t cut – contours, the profile of edges etc. So I basically go 60, 120, 180, 240, 320, wipe body with damp cloth to raise fibres, 400, do a Timbermate slurry, let dry, then a final 400 to get it ready for priming. And that’s where I am now: body mounted on trusty painting stick!

With any luck I’ll get a couple of primer coats on and hopefully the first of the colour coats before the weekend is done!
16/10/16
And as hoped, first colour coats went down. Only a key coat and then one more light one over it so far so very patchy, but I think the colour will work well. For those interested I did a three light coats of White Knight general purpose primer, then MTN94 RV-173 Ultraviolet.
20/10/16
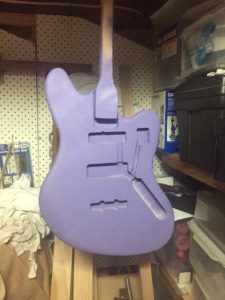
The colour coats are now sorted. I did two more since the last post, so one key coat and three double headers. I’ve lightly buffed it back with 800 and it’s nice and smooth – so on to the joys of gloss coats!
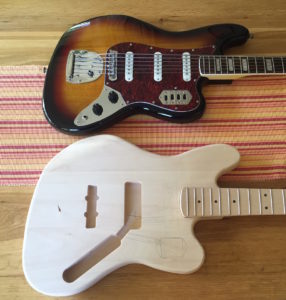
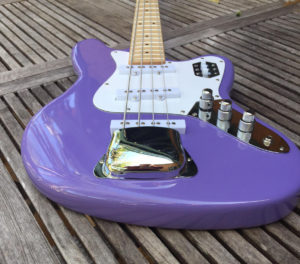
Just for fun I put the components roughly on top to see how the Bass IV would look – I’ll be making a completely new pickguard as the middle pickup needs to be slightly further back than the existing pickguard allows so that all three are equally spaced, let alone the rounding off of the lower horn. I quite like the starkness of the white, so instead of doing a very light stain on the neck to “age” it, I’m thinking of just going with some Tru-oil. It’ll loose a little of the whiteness but not too much…
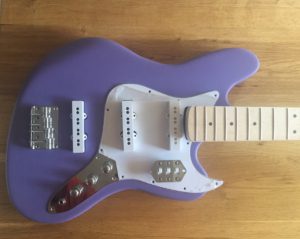
You can also see the two different bridges I have available for it. The larger one was designed to replicate the look of the tremolo bridge on the Bass VI, which it kinda does but I think it makes the back end of the guitar a bit crowded. I think I’ll probably end up with using the smaller one.
26/10/16
Final gloss coat (of 10) went on yesterday. I think I did a much better job this time around in keeping the coats light but even, and using the “double header” technique more effectively. I also paid particular attention to spraying the edges of the body. First time around I realised I sprayed directly on the body, and directly on the sides, but left the edges potentially a little light on. This time I did a pass at 45 degrees to the body, directly targeting the edge all the way around every second coat.
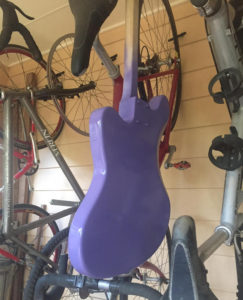
With some nice weather in Sydney I managed to find a good undercover but outside spot hanging off the brake lever of one of the bikes! Already a pretty decent shine on it before any cutting back and polishing. Last time I waited just 10 days before starting on the finishing, which I know as way less than many recommend. My key criteria was when the body stopped smelling of paint! I may have got a little lucky. I’ll assess things the weekend after next …
27/10/16
Not much action while waiting for paint to cure, but did get the logo on last night… In case you’re interested all the numbers on the patent pending stuff include my birthday, postcode, date of build etc etc – effectively an elaborate serial number!
![]()
4/11/16
And so the next stage begins… It’s been 10 days of gloss coat curing, which I know a lot of folks would say isn’t quite enough. However that’s what it took on my first build, and the weather has actually been much more conducive to curing this time around. One thing I think helps in the process is that when I put the gloss on I do it in pretty thin double-header layers – one in the morning before work, one in the evening when I get home. It’s almost more of a heavy mist than a “wet” coat. It’s a technique my dad told me about that he has used in boat restoration (which he does for a museum down in Tassie now he’s retired). After 10-12 coats it has built up nicely. My feeling is that with each application getting about 12 hours to dry before the next I avoid some problems. Anyway, not sure if that’s technically correct but it’s worked for me so far!
Today marks 10-11 days since the last gloss coat so I did a quick test wet sand/polish (light rub with 1200, then with 2000, then a bit of Meguiers) – but only on the patch that will eventually get covered by the neck plate (just in case it’s not as ready as I’d hoped!). I’ve just done that and it looks good (pic doesn’t capture it that well). So now for some serious wet-sanding! The other interesting job I’ll start on is a new pickguard. On the last one I just had to reshape a bit of the existing one, this time around it’s a whole new one.
6/11/16
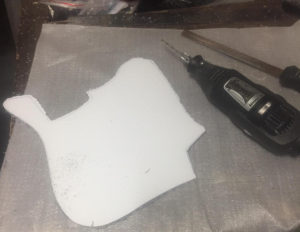
Make a pickguard, he said. It’ll be easy, he said… Well, not that easy!! Today I played around with the custom pickguard. The general advice is to do a rough cut with a Dremel then file and sand. What no one ever tells you is “how” to Dremel it. After a bit of searching it seemed the Dremel 561 bit, a general purpose cutter, was the right attachment. Well, it was, but it wasn’t easy. It was a bit like using a rogue router – although maybe I just need to spend more time getting to know my Dremel. Anyway, rough cut was done, then a bit of filing (lower left of the photo below). I think I’ll get there okay. The interesting challenge is going to be the two pickup holes to put in it!! Stay tuned….
11/12/16
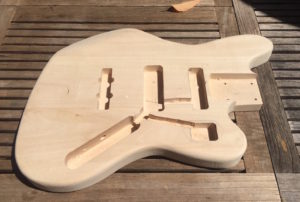
Yep, it’s been a while since the last update! back at the end of November I finally mounted the bridge and other hardware bits and pretty much got it fully assembled and ready for wiring… Thought I’d see if I could work through getting just one of the pickups firing, and after a bit of mucking around it was working well! I could see the end in sight as I worked my way through getting the other two done… and you can see where this is heading! Yep, finally got it all done, plugged it in and… NOTHING! Not even a feeble buzzing!! I decided to give it a rest and come back to it a bit later and restart from scratch. Ah, the joys of guitar building!!
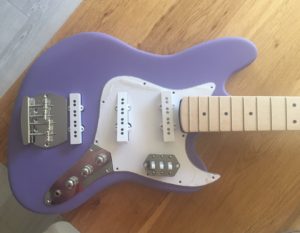
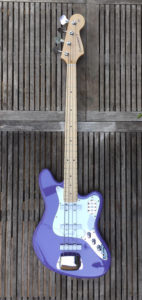
So on the weekend I did finally get back to it, this time using some better cloth-covered wire. It came together quite well and this time when I plugged it in there was life! A quick polish and set-up and I have to say I’ve very excited about this one. I feel I’ve met my original goal of replicating the three pickup/selector switch setup of a Bass VI, and the fact each of the pickups has its own dedicated vol/tone concentric pot setup makes for some pretty interesting tonal variations. Once I’ve had a bit more of a pay with it I’ll certainly post some sound bites. The other thing I love so far is how easy it is to play – those three pickups make for nice thumb rests – and the neck may be my favourite among all my basses!


Pingback: The Surfcaster Project - The Cavan Project
Pingback: Original Song: The Glamorous But Impossible Lives Of Musicians - The Cavan Project
Pingback: Original Song: Birds Are Flying Overhead - The Cavan Project