
The Surfcaster Project
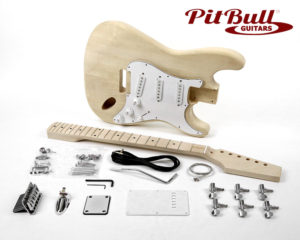
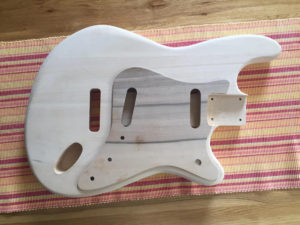
Okay, time to start the next build diary seeing as I’ve finally finished my “Bass IV”. The ST-1M kit (a standard maple-necked Stratocaster shape) arrived Pitbull Guitars about a month ago but as usual there will be a few tweaks for the “Surfcaster”! For starters, instead of the stock pickups I have received two Entwistle AS57 pickups, a neck and a bridge. Why no middle? I won’t be having a middle!
To explain further, the idea for this kit is to try and achieve something similar to the Hard Road E-type Jaguar that Fretworn posted a while back – here’s the video that inspired me: https://www.youtube.com/watch?v=GB4cUe9X35E
The key component for this is a Freeway Ultra switch! I have managed to secure the wiring diagram that the E-type uses from the good folk at Freeway so that’s an excellent start (although the wiring does look a little, um, terrifying!).
As far as body reshaping goes, there will no doubt be some kind of offset mashup because I can’t help myself, and I’ve got an idea for a twist on the standard F headstock shape. I’ll be making a new pickguard as there’s no middle pickup, and I’ll also have to work out where to put a small toggle “bright” switch.
I’m still not entirely sure on the colour but it will probably be another “solid” colour from the MTN paint chart… although there may be a little more “art” tied into it. That’s where the “Surfcaster” idea comes in: I want to draw some inspiration from my other great love – surfing – in terms of the look and feel of the guitar.
Anyway, onwards and upwards – and hopefully some solid progress over the Christmas period when I’ll be having some time off.
2/1/17
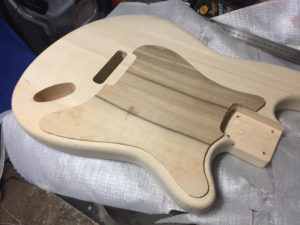
Well, we’re underway and I have managed to cut some bits off the body! I’m still at the 40 grit and rasp stage of body mods, but it’s a start.

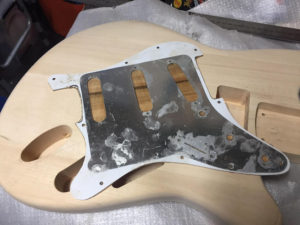
The biggest challenge at the moment is what to do with the pickguard. I can’t use a standard strat one as I’m only using two pickups, and I’m also thinking about filling in the jack rout and plugging in through the pickguard. I didn’t particularly enjoy making a new one for the last build, so I’m looking for a different approach. I also want to paint over the pickguard (I’ve now decided the body won’t be just a single solid colour) but I’m concerned about how the paint will take to the plastic of the guard. One option at this point is to get a very thin veneer and epoxy it to the standard pickguard. That way I’ll cover off the two challenges: paint will now go on to wood, and I’ll also be about to cover up the standard strat routs and holes in the pickguard that I won’t be using.
Anyway, that’s where I’m at … and with any luck I’ll nail a couple of steps over the next weeks.
3/1/17
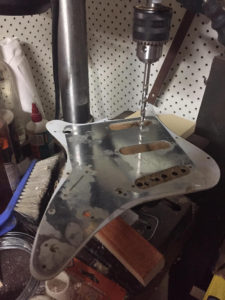
I decided to stop over-thinking the pickguard thing and just do what I’d originally thought of – the veneer option. The veneer came from a sample pack I think I bought at a woodworking show many years ago. Of the dozen or so in the pack, some were a bit wavy, so I chose the cleanest and flattest one for the job. It looks like Tassie Blackbutt a bit but I’m not sure.
Some 5min epoxy seems to have worked well, and I’ve done a very preliminary rough shaping. The veneer is only 1mm thick, so when I bevel the edge you’ll still see the white/black/white edge of the original but that should work in okay with the paint scheme. In some ways it’s a pity to cover that nice veneer with paint, but I’m sticking to my plan. I’ll let it dry properly overnight before doing any more tidying up around the edges and doing a bit of scraping on the surface to clear off the excess epoxy that somehow magically found it’s way there.
Next step is to finally decide whether to fill in the jack cavity, and then do the routing near the lower horn for the pickup selector switch.
5/1/17
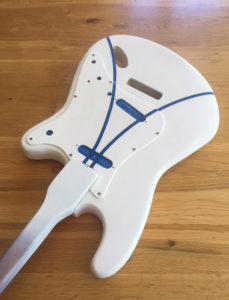
So the pickguard looks like it’s worked out! After glueing the veneer on the old one, and then doing some re-shaping of the whole thing, I drilled out the holes I still needed (there’s a bright switch hole to be done, but the switch won’t arrive until next week).
I think the shape looks okay with the body, and will certainly help with the painting I’m planning. One thing: by taking off the bits at the rear of the pickguard that normally “frame” the trem, I’ve lost a place to put a pickguard mounting screw. To solve this I’ll be gluing a small triangle of wood in the cavity to give another mounting point – I’ll take a pic when I get around to it to explain it better).
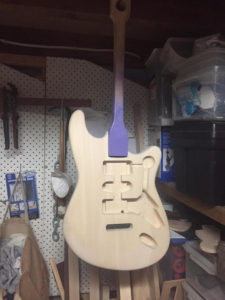
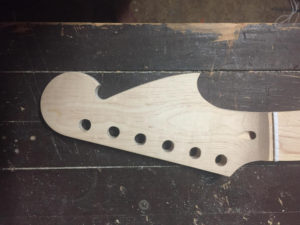
Finally I did a first pass on shaping the headstock. Seeing as there is a surf connection to this build I’ve tried to make it look like a couple of waves – I ended up taking a lot more wood off than I’d thought I’d need to but I’m pretty happy with the result. It just needs a bit of cleaning up – and I think I need to add a little more “hook” to the cut near the nut.

6/1/17
I’ve just finished the routing for the Freeway switch – and I almost blew it in that I drilled the hole in the pickguard without establishing just how much room I needed for the rout. You can see the pencil lines on the body to show how close it was to messing up! I also did this rout with the dremel and the drill press… normally I break out the router for something like this so happy the new technique worked okay. You can also see the small wedge of wood I’ve glued on the far side of the control cavity – this is the one that the pickguard screw will attach to now I’ve cut away the normal bit of the pickguard where it would have attached (if that makes sense!).

13/1/17
Bit of progress in the past couple of days… final body shaping was completed, then the normal procedure: sanded with 80, 120, 240, 400, wiped down with damp cloth, 400 sand again, wiped down with a timbermate slurry, then sanded with 400 again. I then vacuumed the body to get rid of all the dust and wiped it down with a clean cloth. Final step was attaching my “painting stick”, so if the wind dies down a bit later I’ll do the first primer coat.
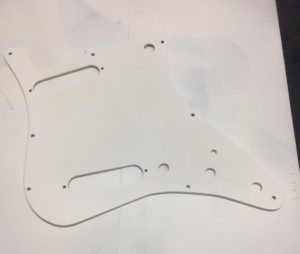
I also finished off the pickguard as it will be following the next few painting steps alongside the body. I first finished drilling all the relevant holes, sanded with 240 and 400, wiped down with damp cloth, 400 sand again, wiped down with a timbermate slurry (probably didnt need to do the timbermate but figured why not!), then sanded with 400 again. I’m really looking forward to the painting stage with this one so very happy to get to that point…
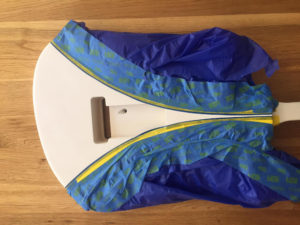
As far as the painting goes, I might as well reveal the plan. As I’ve said this is surf inspired. I’m a kneeboarder (yep, there are some of us left!) and I’ve always ridden Friar Tuck boards. The board in the middle of the picture below is my current favourite, so I’m modelling the paint scheme on it.
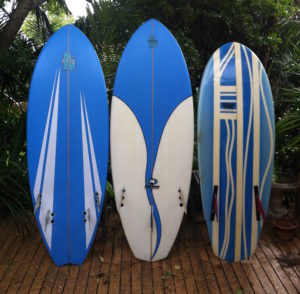
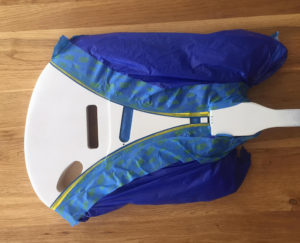
Flip the board on its side and we’re getting close. I’ll start by painting the body and pickguard white. I’ll then attach the pickguard and mask everything off to do the blue wedge (I’m not going to do the wiggly “sperm” tail – just a straighter kind of thing). That’s why I need to be able to paint the pickguard. Then I’ll mask again to get that black keyline. Hopefully it will work out and be quite striking, but we’ll see!
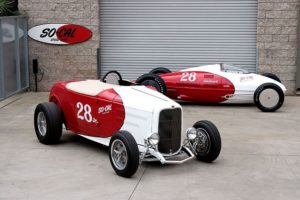
I’ve also always loved what the guys at SoCal hotrods do with their artwork – you can see the similarities with the Friar Tuck paintjob in this pic.
Oh, and I took a little more of the headstock to give it a better wave feel!
19/01/17
Slowly making progress. Body and pickguard are primed and another coat will have the white base coat done. The next stage is a challenge as anything more than a single colour finish is new to me!
The illustration shows what I’m doing – the body is painted white, and I’ll have the centre section painted blue. I figure I’ll use 3mm pinstripers masking tape to create the curve, then wider tape and newspaper to create the mask. The thing is I want a black keyline between the two colours.
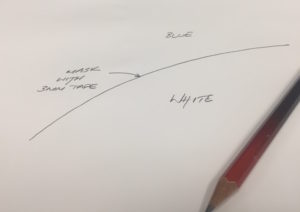
I figure there are two options: 1) leave the masking in place, then create a second masking line 1mm wide on the blue part, cover all the blue with paper, then spray the line with black. Option 2 would be to finish the blue section, then take all the masking off, then mask .5mm on either side of the paint “join” line and then spray that bit black. I think the advantage of this is that I won’t be building up two layers of colour next to the white, but on the downside it will be a bit fiddly.
26/1/17
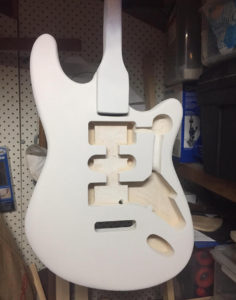
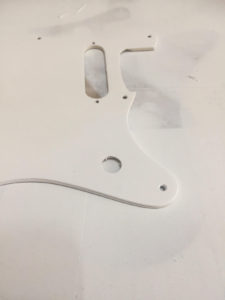
So, I’m now at the stage where both the body and the pickguard have had their base white coats…
Next I’ll lightly “wipe” some 600 or 800 over them, in particular along the masking line as I want the tape to make good contact to minimise bleeding. Then I need to actually fit the pickguard as the next step of masking and painting require it to be in place.
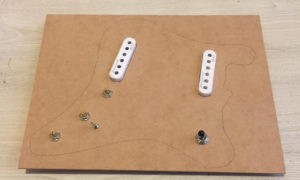
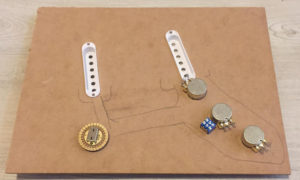
I’ve also whipped up a quick dummy pickguard and mounted the electronic stuff on it – I know this is going to be a fiddly wiring effort so wanted something nice and stable to work from. I’ve also roughly marked the routing wiring can be kept to the right length. Once this is finished it will simply a matter of attaching it to the real pickguard and then wiring in the jack and bridge ground.
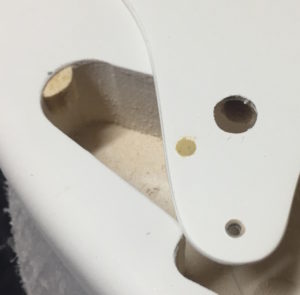
Well, pride before a fall! Went to mount the pickguard and two of the mounting screws are in spots over the cavity. Normally I turn mistakes into opportunities to do something different but no real options here. I’ve plugged one with timbermate and glued a small piece of wood in the cavity for another. Sadly it means I’m on hold for the next stage until I paint over the plug… ah well, thems the breaks.
But it did work out in the end!
28/1/17
A good day – including a trip to Anagote Timbers to pick up some supplies for another build! On this one, all the white basecoating is done, and the issues with the pickguard are all solved. Today I’ve masked up the body, first with 3mm plastic auto trimmers masking tape, then with a couple of other tapes and a bunch of plastic sheeting. If the temperature drops a little in the next hour or so and the wind dies down, I’ll try and get the first mist coat on. Btw, to get the long curves, I attached a pencil to a piece of string and then played around with the length of string to my thumb to get the right curve – made it a pretty simple job.
30/1/17
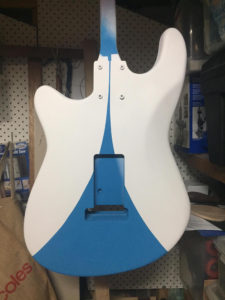
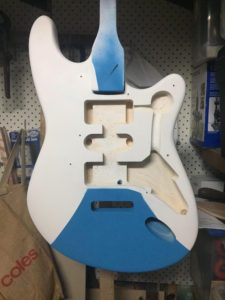
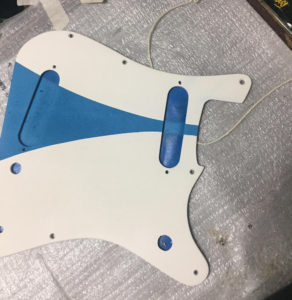
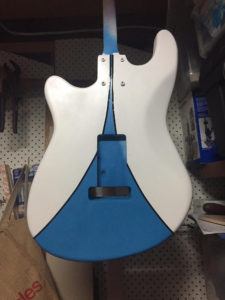
Tonight, after three coats of the blue, I unmasked! Pretty happy with the result other than a couple of bleed points where the blue joins the pickguard and on the corner of the neck pocket. The pickguard ones I kind of expected as it proved pretty difficult to mask the “step” between the two surfaces, and I’ve got no idea at all how the neck one happened!! Still, I think I should be able to clean them up enough to get by – it probably looks a bit worse in the photo than it does in real life. I’m really happy with the blue in that I wanted it to look like the blue was sprayed on a surfboard blank rather than absolutely solid. It’ll be interesting to see how it all looks after clear coating.
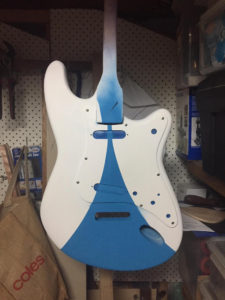
Still working on a couple of ideas for the black keyline though!
31/1/17
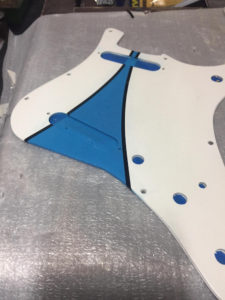
One of the guys on the Pitbull forum suggested I get to fixing the bleed before the paint dried too hard, so I immediately went down to the workshop and got most of it out using 800 and 1200. The pickguard is all clear, but the body is still a little off, although I think it should be less visable once the black keyline goes on. You might also see on the body shot a small black line on the body holder – that was a test using a black posca pen. I’m toying with either that or using black auto pinstripe tape, but I’ll need to do a test to see how it reacts to the clear coat.
5/2/17
A few days and a bit of progress! With colour coats complete, on a whim I decided on a different approach. First a did a couple of light layers of clear, then did the pinstriping with automotive tape (after a long discussion with the bloke in the shop who assured me he’d applied acrylic over the tape and it had worked fine!). It was very easy to do I have to say. I then did another clear. At this point the tape decided to lift a little and I thought I was screwed, but I’ve managed to keep it in place and do a couple more coats. I think I’ve got it firmly fixed now. I’m happy with the pickguard and front, the back isn’t quite as tight but close enough! I’m going to do a heap of clears to get try and get a glassed look so I’ll have to be patient!!

More to come!
