Elvis Costello Inspired Jazzmaster Project (Kit Guitar)
7/7/17
Time to get back in the saddle and build another guitar! The kit guitar is due on Monday from Pitbull Guitars (a JZA-1) and I’m really excited to get cracking on this one. Probably the biggest change for me with this kit is that I won’t be modifying the body. It feels a bit weird to leave it intact given I’ve never done a kit without a few tweaks, but there’s simply nothing I want to do! Then again, my mantra for kit building is to always create something I couldn’t buy off the shelf so there will be some fun stuff.
The plan is to do a walnut stain as a nod to the Elvis Costello Jazzmaster, but the interesting stuff will be more around what I do with the pickups and switching. I hope to replace the toggle switch with a 5-way switch and use the Bill Lawrence 5-way Telecaster Circuit that delivers the following:
- Position 1: neck pickup alone
- Position 2: neck + bridge in parallel
- Position 3: bridge pickup alone
- Position 4: neck + bridge in parallel “half out of phase”
- Position 5: neck pickup alone with 10 percent less low end than position 1
This is similar to the Jerry Donahue wiring Peavey and Fender have offered.
I also want to have a toggle switch on the upper horn with the idea being to have a blower switch that links the neck pickup to the output directly, but perhaps have a low pass filter on it (especially as the position 5 of the Lawrence set-up is effectively a high pass filter). This will naturally require an extra bit of routing. I’m not sold on the specifics of this one yet, so if anyone has some interesting ideas on what I could do with an extra toggle there I’d welcome your thoughts.
There are a couple of ways I can approach mounting this stuff. One is to simple make a new pickguard with all the relevant holes. The other is to make it a bit more Jaguar-like with control plates. The issue here is that the plates are effectively custom – the 5-way switch would be like the one on the Johnny Marr Jag, and the top horn toggle plate would truly be custom. I have found a place in the US called Faction Guitars who make custom plates, but they are US$50 each. Or I make my own…
Anyway, that’s the plan at the moment. I figure I’ve got a little time to consolidate my ideas while sanding the body!
14/7/17
Kit has arrived! And have had the obligatory bit of a poke about checking things out.

Interesting the JZA neck is significantly narrower than the PBG strat necks – maybe almost 2mm at the heel. I only know because I wanted to see if the reverse headstock neck I bought previously would fit. The neck pocket is also a bit out – the base isn’t flat – so a bit of work there. Headstock is also preshaped and pretty roughly so will need to tidy up the lines too.
Body seems great, a little rough in places but nothing that will be an issue once I sand. Given I’m staining, the grain is okay – the one piece of wood that’s a bit different runs just on the lower half and will only be really visible from the front below the trem unit so not too bad.
15/7/17
So this morning I figured I’d do a bit of a trail with cutting aluminium plate. I’ve found a local supplier who has offcuts quite cheap (570 x 490 sheet for $8) . Originally I’d thought 3mm thick would be the go, but instead I went with 1.6mm – certainly seems stiff enough for the purposes I have. I grabbed a short metal cutting bit for the jigsaw and went to work. After the rough cut I tried a variety of approaches to get it closer to right: files, sandpaper, and a drum sand bit on the drill press. All three worked in their own way, but there’s still a bit of work to get it finished nicely. Given my dislike of creating pickguards this was much more straightforward than I’d expected. The thin aluminium is quite easy to work with. I’ll also make some control plates before deciding whether to go full alloy pickguard or combine it with a regular pickguard (Jaguar style).
Here’s where I’m at – the sheet still has the protective film on it and I’ve tried to avoid scratches, but I’m pretty sure there’ll be some to address when I peel it off. More shaping and fine-tuning to go, but it’s a good start. I’d certainly recommend giving it a go if you’ve got a project it could work on.

16/7/17
Well it turned out the neck pocket issues were a little more challenging that I thought. I had a chat with Pitbull, and with the exceptional customer service we’ve all come to know, he’s offered to replace the kit. You can understand with new kits that it can take a little time to iron out all the bugs back at the factory, so hopefully I’m helping that process.
So it’s back to being a little patient – although it does mean I can continue to work on my aluminium control plates and pickguard skills in the meantime!!
18/7/17
Feeling pretty chuffed with my efforts today! While waiting for the replacement kit I’ve worked on a potential pickguard. As per the previous post about it, I cut the rough shape with a jigsaw from a 1.6mm aluminium sheet. Today involved a heap of drilling, sanding and filing, before using a green scotchbrite to buff it. The hardest part was the slot for the switch – I used a dremel cutting wheel to get through, then little files to open it up. There’s still a fair bit of clean up work required especially the neck pocket at waiting for the neck to match that up right. Also some work with the pickup holes – including drilling for the pickup rings I’ll be using – but I’ll wait to do a mock build to get everything lined up. That said, very happy with the results at this point.

21/7/17
Arrived back from a morning run to discover a box on the doorstep! Yep, replacement kit has arrived. Quick check of everything and all looked okay. The heel of the neck is still a little out, but nothing a shim can’t fix. I’m particularly pleased with the grain on this body. And so I got stuck into it!
The progress today saw a new top rout for the toggle switch, elongating the existing toggle switch rout so I can put a 5-way switch in there, and expanding the trem rout – it needed about 2-3mm taken off each side and the same on the back edge. I then cut some offcut veneer into three sections to use for the neck pocket shim and glued them in place.
25/7
Okay, we’re back on track. The replacement kit arrived, and there were still some issues with the neck pocket. Adam is now working with the factory on this front, but rather than wait for it to be resolved I’m forging ahead. I figure I should be able to get a result with some very careful reshaping of the neck heel (thanks to some valuable advice from Wok, Dedman and Ponch). In the meantime here’s the latest.
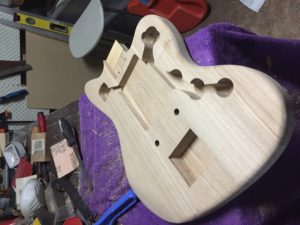
First step was to complete a new top rout for the toggle switch; elongating the existing toggle switch rout so I can put a 5-way switch in there; and expanding the trem rout – it needed about 2-3mm taken off each side and the same on the back edge. While the two routs are just about acceptable, the trem cavity is a bit rough after I went at it with a chisel (thankfully all will be hidden under the pickguard). A good couple of sanding sessions, starting at 80 and working my way up to 240 grit had this result.

Next I went with walnut timbermate. I did try the ebony version on a scrap but felt the walnut would look better for what I had in mind. After that was dry I went at it again with 240 and did the first coat of stain.

After 24 hours I actually sanded back with 240 as there were a couple of areas I didn’t go hard enough at the first time. Then I went to 320 grit and then stained again.

I’m pretty happy with this, although I may do a third light stain. It’s almost the colour I’m after so I’ll let this one dry for a couple of days and reassess. And I couldn’t resist a quick mockup…

It’ll have black tips on the toggle, 5-way and trem arm too. The knobs are potentially a little large as they are from a bass rather than the Mustang style (which might mean another order from Realparts!). Lots of fine tuning to come…
27/7/17
I think I may have got confused with the wiring ideas I had for my current JZA build. What I have planned is this: https://www.premierguitar.com/articl…caster-circuit
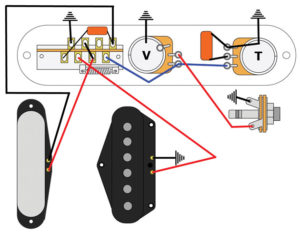
Yep, it’s for a tele, but I’m hoping it will work with the P90s. I’ve also made a hole at the top for a toggle switch – the Gibson 3-way style one. I originally thought I would add a blower switch but of course I’ve now realised that’s a DPDT on/on switch.
I figure I have a couple of options.
1. Just buy a DPDT on/on switch
2. Use the switch I have, but somehow wire it so it does something similar
3. Use the existing switch I have but do something entirely different.
I’m not wedded to any of the toggle ideas – I’d just like to try something different. It probably goes without saying that I’m not great with this stuff so there’ll be lots of thought going into this!!
31/7/17
I’m now a fair way in on doing the gloss coats – gotta love the Sydney weather at the moment. When I started doing the gloss coats the body was certainly nice and smooth, but as I’ve been doing successive layers of the gloss I can now feel very small ridges that run with the grain. I feel like with about 10 coats on it should have enough to be able to buff back after curing, but given I’ve never done a stain finish like this (and indeed only ever worked with basswood rather than ash) I wondered if I should do even more. We’ll see!

6/8/17
And so, after the painful week of gloss coat curing, I was able to start the finishing process. As I’d put 12 coats of gloss on, I was happy to start with a light sand with 800 wet and dry to get a feel for how much I’d need to take off. As I mentioned earlier, I could feel what seemed like “grain ridges” in the top coat, but I actually quite liked them. I wanted a finish that was like an old antique (a well polished one!) rather than that “brand new” perfect finish, especially as the aluminium pickguard is such a contrast. So I did my 800 cut, then moved to 1200, then 1500 then 2000. The idea was to get everything in good shape to take the shine rather than knock it back to perfectly flat. Here’s where we are at with a quick crack with some Maguiers Compound. Before finishing everything off I’ll do some proper polishing, but I really like how it’s looking so far – you can see in the lit section at the top the small imperfections I’ve kept to get the feel I’m after.

Now I’ve got to this point I can check the alignment on everything and get the pickup surround holes drilled – I wanted to wait to attach the neck to get this done as I still have the ability to expand the pickup holes a little should I need to. Hmm, maybe I’d better get cracking on the neck! Oh, and that’s the pickguard with the protective coat over it – doesn’t take any finger prints now but still looks nice and raw.
8/8/17
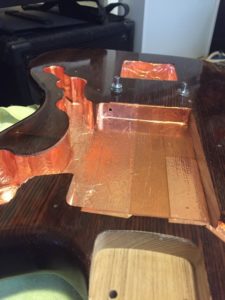
I really do hate shielding – just when you think you’ve nailed it you start finding multiple places you’ve missed. What’s more, I’ve just realised I put the bridge posts in without the ground wire (see that sad little empty ground hole). I’ll now have to drill a new hole into the trem cavity and ground from there *sigh*